

Your hoodie sample arrives and almost everything is right. The sleeves are great, the chest is great, the bottom is great, and the pockets have plenty of room. But the neck is choking you. You did everything you could: you took an existing hoodie, you measured it, and the sample still came back unwearable.
Shadi Adada, founder and creative director of FittDesign, has worked with thousands of brands over the last 10 years developing every kind of hoodie, from compression seamless knits to oversized drop shoulder French terry and athletic raglan hoodies in brushed fleece. In his experience, a hoodie is never one or two measurements. It's all of the measurements working together. Here are the 12 core measurements he uses, and how to take each one.
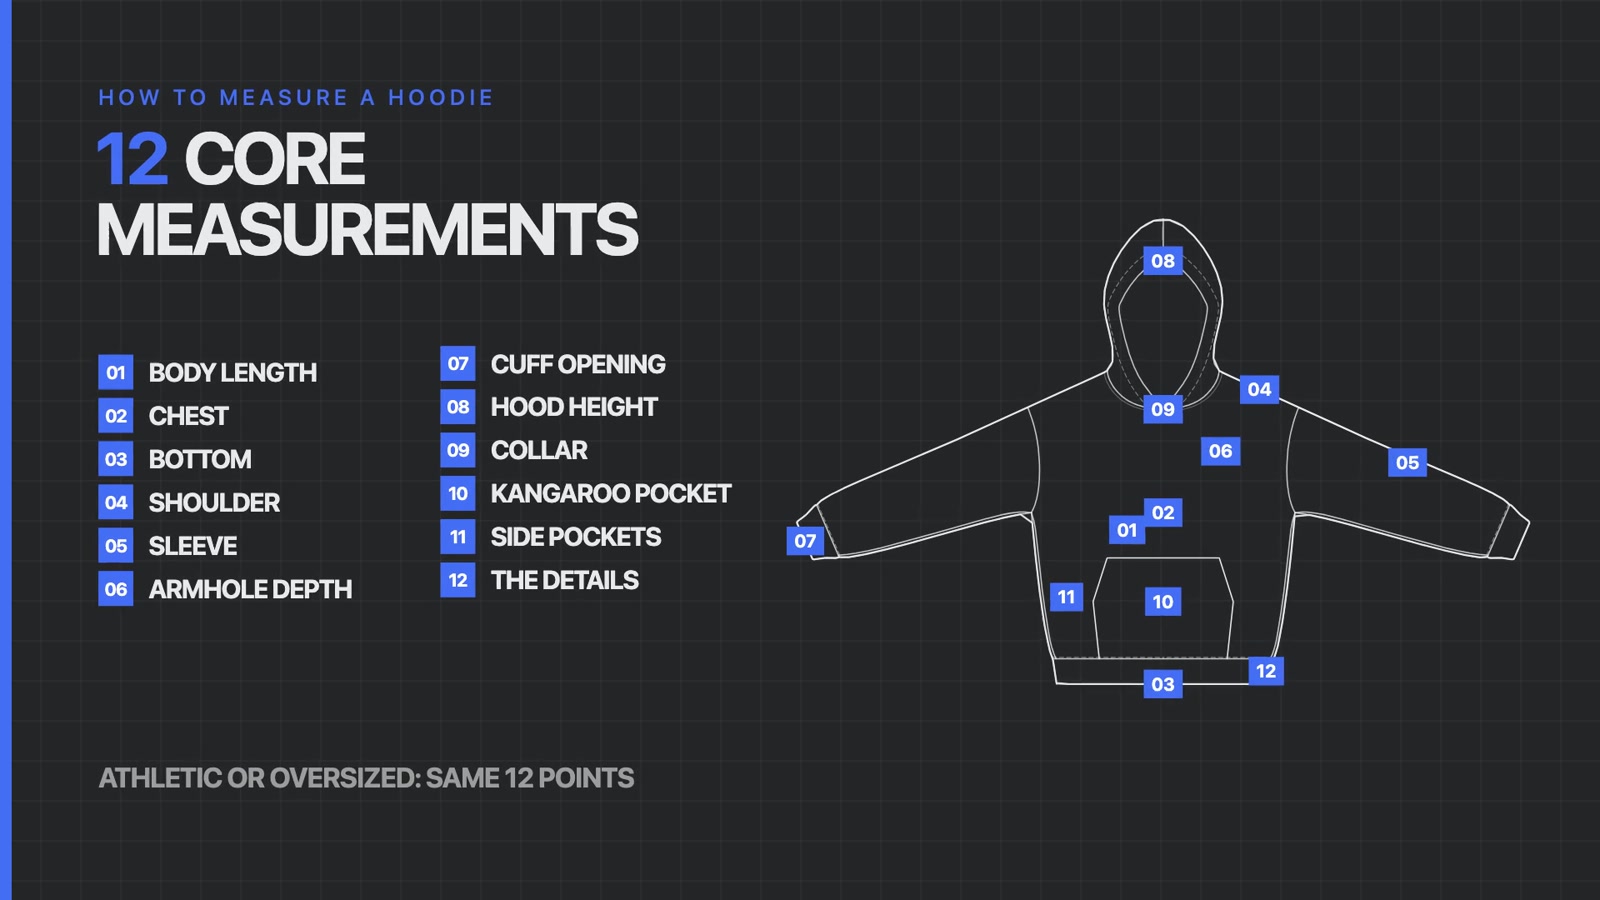
The short answer: Lay the hoodie completely flat, measure to the eighth of an inch, and take all 12 points: body length, chest, bottom, shoulder, sleeve, armhole depth, cuff opening, hood height, collar half width with its center back to center front drop, kangaroo pocket, side pockets and the small details. Leave one out of your tech pack and it can make or break the fit.
Prefer to watch? The full episode is embedded at the bottom of this post, along with the complete script.
Rule One: Lay It Flat and Measure to the Eighth of an Inch
Whether you're measuring a sample or a reference hoodie for fit, lay it out flat on a completely flat surface with no bumps in it. Then use a tape measure that's accurate down to the millimeter, or down to the eighth or even the sixteenth of an inch.
- Zip-up hoodies: make sure it's fully zipped before you measure.
- Elasticated cuffs and hems: release or relax the elastic and let it lie naturally, unstretched and unpulled.
That's how you get the most accurate and consistent measurement possible.
1. Body Length
There are two ways to take it. From the HPS, the highest point of the shoulder, measured from the stitch line straight down to the edge of the fabric at the hem. Or from the center back, from where the neckline swoops down at the back, down to the bottom hemline.
Shadi usually measures the center back on tops because he finds it the most consistent, and saves the HPS for garments like tank tops and sports bras that may not have a clearly defined center back. Expect the two to differ by around an inch, maybe an inch and a bit, depending on the garment.
Spec tip: note the size you measured and keep it consistent. Shadi measures a size medium on men's and a size small on women's, because those are his sample sizes.
2. Chest Half Width
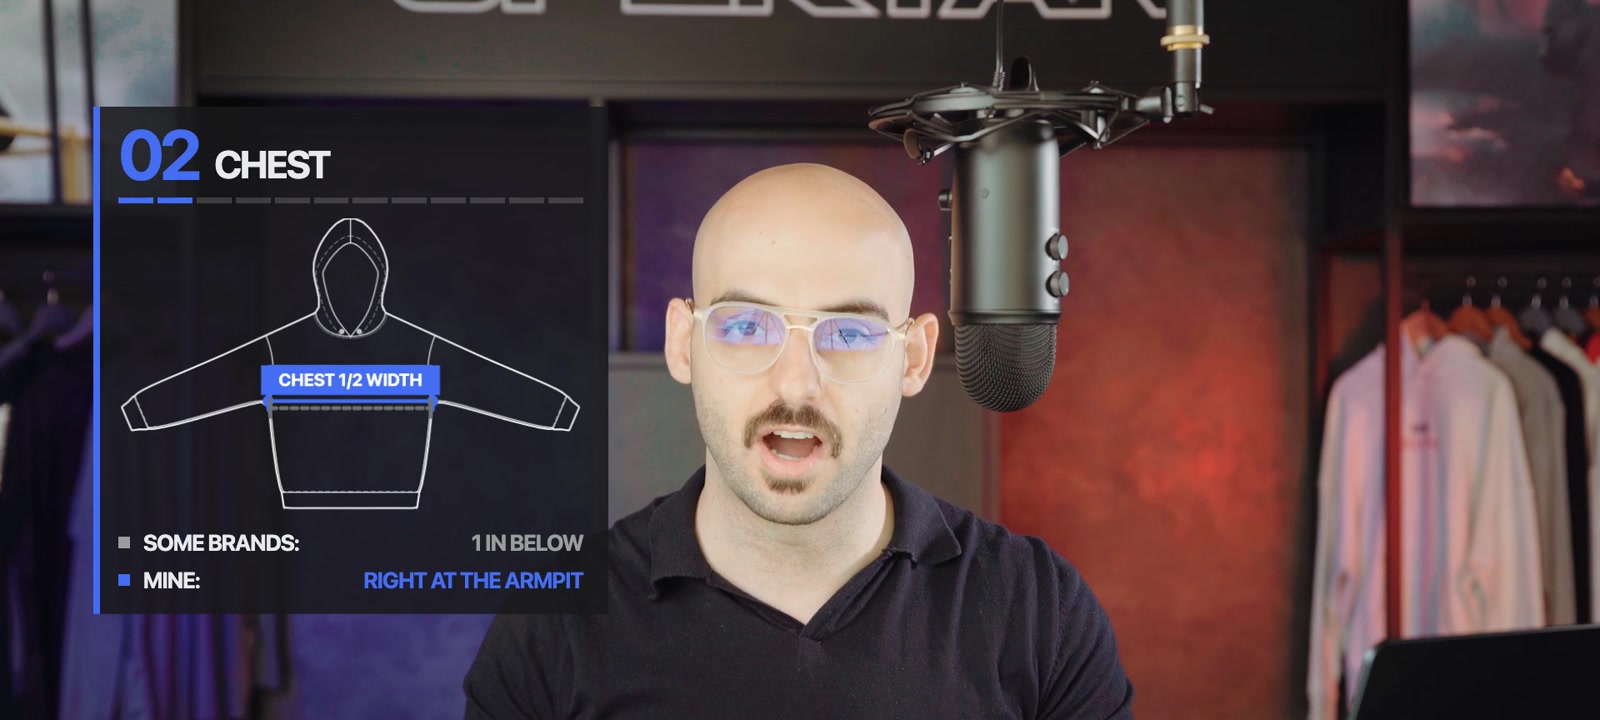
Measure from armpit to armpit: the point where the sleeve inserts into the side seam, from the left armpit all the way across to the right. Some companies measure one inch below the armpit instead. Shadi measures right at the armpit because he can mark it visually every time, so the measurement stays consistent.
3. Bottom Half Width, and the Waist
Measure the bottom from the bottom left corner where the hemline ends to the bottom right corner, below the cuff and not above it. Don't stretch the hemline and don't tighten it.
On an athletic cut that tapers in at the waist, also take the waist half width: find the middle between the chest line and the bottom line, and measure across there from edge of fabric to edge of fabric.
- Boxy cut: the chest, the waist and the bottom should be the same.
- Tapered cut: it looks almost like a trapezoid, with the waist right in the middle. If the chest half width is 22 and the bottom half width is 20, the waist half width would be 21.
- Aggressive taper: the waist half width can end up smaller than the bottom half width.
4. Shoulder Length
Some brands measure across the shoulders from the left shoulder seam to the right. Shadi measures the actual shoulder line: from where the collar half width ends, down to where the shoulder ends and the sleeve begins. It gives a good indication of the overall length, and he sometimes measures the perpendicular depth of the shoulder slope too.
On a raglan sleeve, shoulder length is unnecessary, simply because there's no dedicated shoulder seam.
5. Sleeve Length
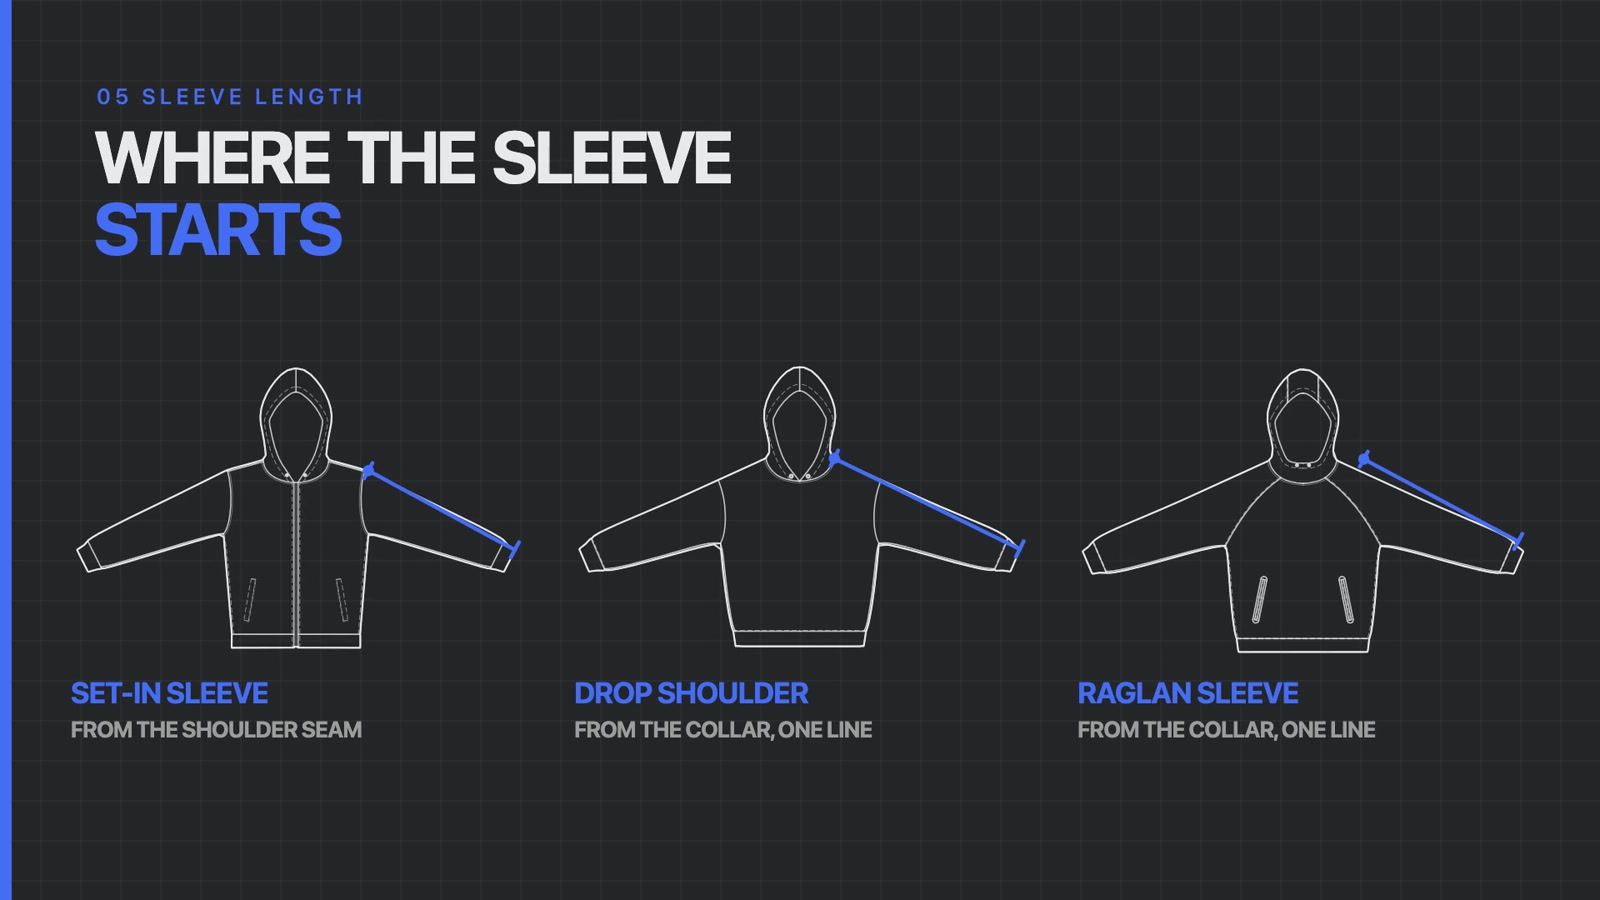
On a set-in sleeve, where the sleeve and the torso are separate pieces, sleeve length runs from where the shoulder length ends all the way down to where the cuff ends.
A drop shoulder works more like a raglan, because the shoulder seam and the sleeve seam behave as one. So on both a raglan and a drop shoulder, Shadi measures from the edge of the collar half width all the way down to the end of the cuff, in one measurement.
Measuring a hoodie for your next collection?
Which points go on the tech pack, and the tolerances for each one, are worth settling with your manufacturer before the first sample is made.
6. Perpendicular Armhole Depth
On a drop shoulder or a raglan, measure perpendicularly from the HPS, the edge of the collar, straight down to the chest line you drew from armpit to armpit.
On a set-in sleeve, Shadi measures it in two chunks. First the shoulder drop, from the HPS straight down to where the shoulder slope ends, usually around 1.125 to 1.25 inches depending on the garment. Then the remaining perpendicular armhole depth, from where the shoulder drop ends down to the chest line.
7. Cuff Opening
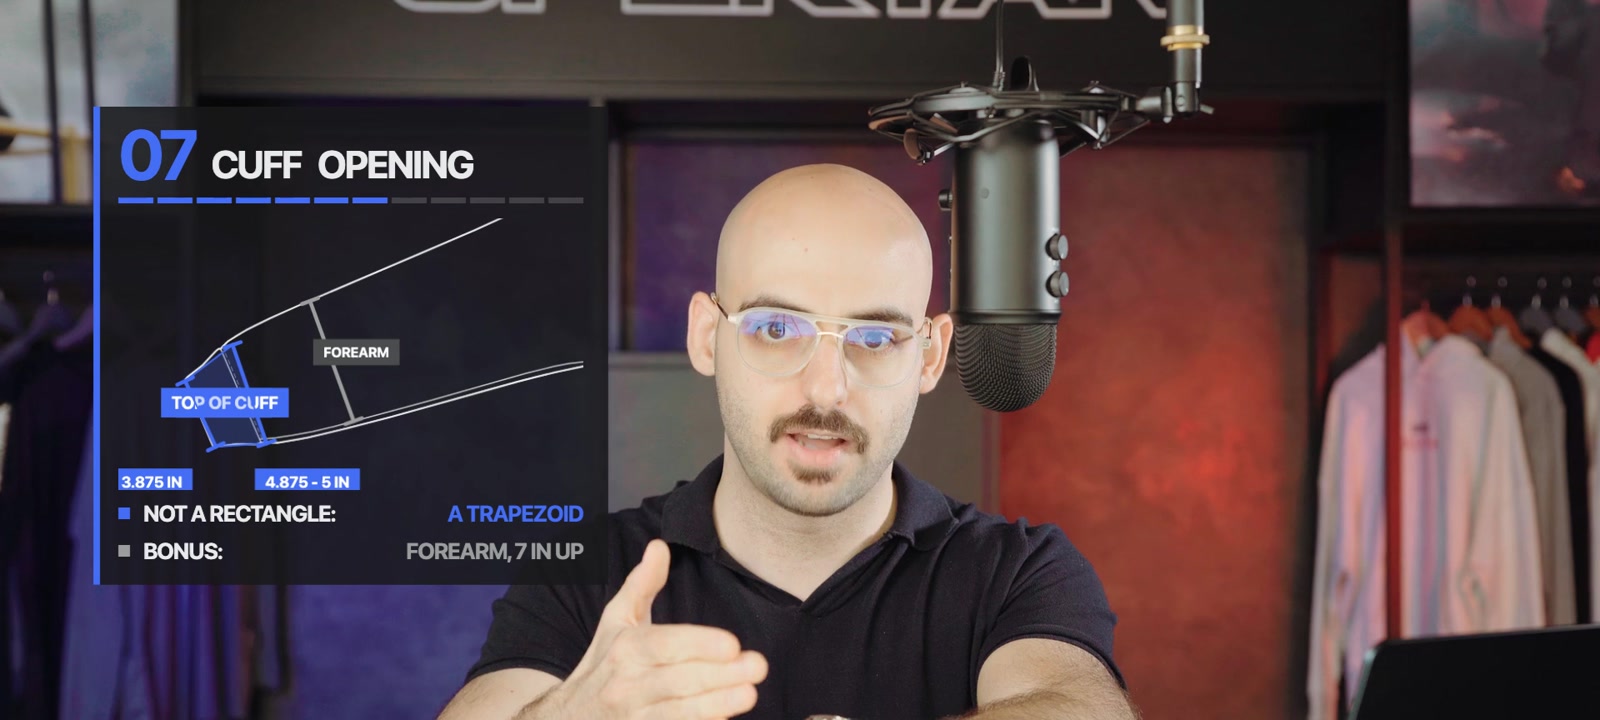
Lay the cuff flat, unstretched and uncrumpled, and measure the opening from edge to edge. Shadi also measures the top of the cuff, where it inserts into the sleeve, because cuffs are almost never a rectangle. They're a trapezoid, and the taper is more aggressive on oversized garments with a looser forearm, bicep and shoulder fit.
Rule of thumb: on an oversized or relaxed hoodie, Shadi typically sees a cuff opening half width of 3.875 inches at the bottom and around 4.875 to 5 inches at the top. As a bonus, he sometimes measures the forearm seven inches up from the cuff opening.
8. Hood Height
Fold the hoodie in half so the hood lies flat on its side and you can see its profile. Measure from where the center back would be, perpendicular up to the top of the crown. As a rule of thumb, a size medium comes out around 15.5 inches, and it's pretty consistent.
9. Collar Half Width and the Center Back to Center Front Drop
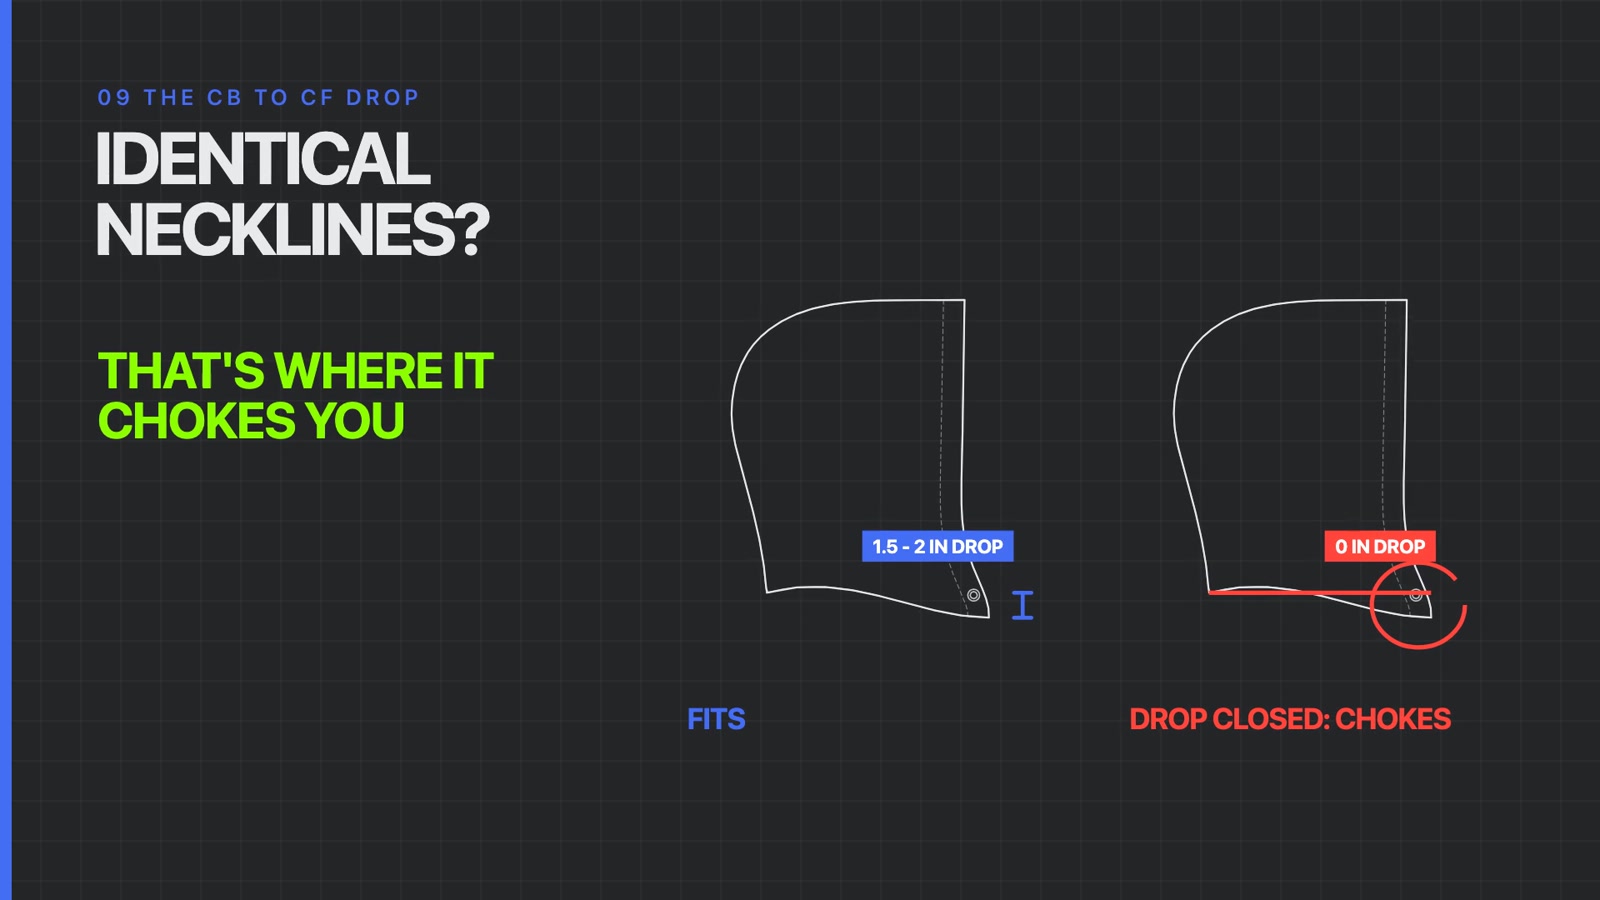
In the same side view, measure the collar half width horizontally from the center back to the center front. You'll notice the neckline makes a slight S shape, because the front neckline and the back neckline are never the same length.
Then take the bonus measurement that matters most: the drop between the center back and the center front. It's usually around 1.5 to 1.75 inches, maybe even 2 inches depending on the fit. Make them identical, or close to identical, and the hood fits on the left and right shoulders but not at the center front. That's where it starts to choke you.
10. Kangaroo Pocket
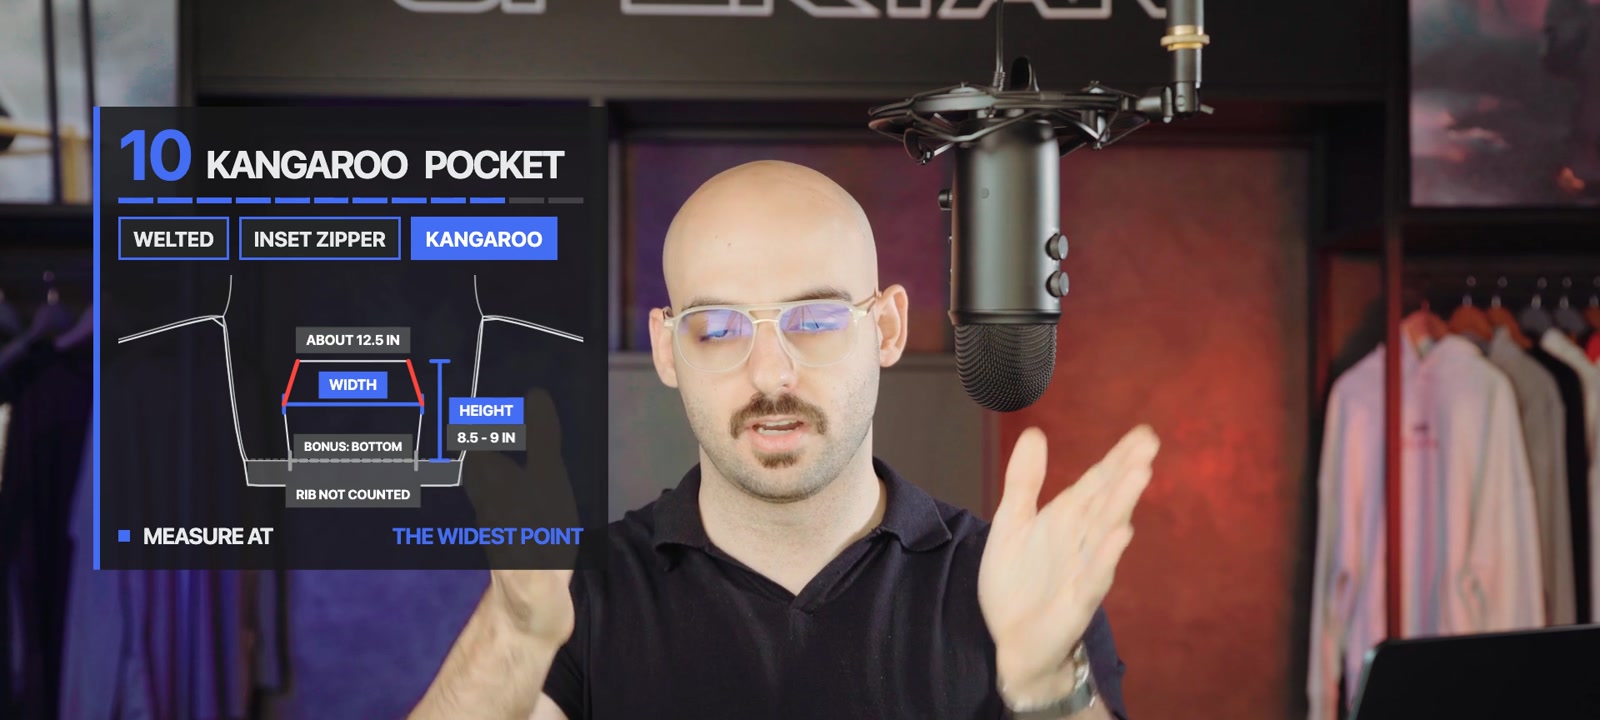
Measure the width from widest point to widest point, and the height from where the pocket inserts into the waistband up to where it ends. The waistband isn't counted.
- Height: typically around 8.5 to 9 inches.
- Width: typically around 12.5 inches.
The edges of a kangaroo pocket are usually angled, so Shadi measures at the widest point, where the slope starts, rather than at the bottom. You can take the bottom too, as a bonus, to see how much clearance there is.
11. Inset Zipper and Welt Pockets
These pockets sit separate from the waistband. Measure the pocket opening parallel to the opening itself, then how far in it sits from the side seam. If it's angled, give the outermost point and how angled it is, at five degrees or ten degrees for example.
Don't set them too far in, or the pocket bags end up too small. Shadi keeps them around 1.5 to 2 inches from the side seams, with an opening of at least 6.25 to 6.5 inches on a men's hoodie. Some women's hoodies, especially cropped ones, may need smaller pockets.
12. The Details
The last group covers everything that sets the character of the hoodie: the cuff heights at the wrist and the waistband, the stitching on the edge of the hood (a quarter inch or an inch and a quarter offset), the drawcords, and the finishings on the pockets, like the width of a welt. A super chunky hoodie with a very small cuff or a half inch hood finish just looks off. On a chunky hoodie a welt might be 0.5 or 0.75 inches; on a more technical hoodie, around 0.5 inches keeps it low profile and hidden.
The Takeaway: All 12, Every Sample
Shadi compares it to a bespoke suit: knowing which measurements to take from your customer, and how to put them into the jacket, is what creates a beautiful fit. With all 12 on your tech pack, when the sample comes back from the factory you know where you went right, where you went wrong and what to fix.
- Lay it flat, zipped, cuffs relaxed, and measure to the eighth of an inch.
- Keep one sample size and one method for every measurement.
- Never leave out the center back to center front drop.
Choosing a fabric for the hoodie as well? Shadi compares the two most common options in French terry vs fleece: which hoodie fabric should you pick.
🎬 Watch the full episode. Shadi walks through all 12 measurements on FittDesign's own drop shoulder, set-in and raglan hoodie flats. Watch on YouTube

Full Episode Script
This is the script of the episode as Shadi delivered it, lightly edited for reading.
The sample that chokes you
So let's say that your hoodie sample arrives, and everything is perfect, but there's something off. When you put it on, the sleeves are great, the chest is great, the bottom is great, the pockets have an ample amount of room in them. But the neck? It's choking you.
And you're really left wondering: I did everything that I could. I actually took an existing hoodie, I measured it, but the sample still came back unwearable. Well, why is this? It's because when we look at any given product, a product isn't just a specific set of measurements. It's all of the measurements working in unison together to create the desired fit.
So over the last 10 years, we've literally worked with thousands of different brands developing different types of hoodies. Whether it's a compression seamless knit hoodie, an oversized drop shoulder French terry hoodie, or an athletic cut, brushed fleece raglan sleeve hoodie, each hoodie isn't just one or two measurements. It's the sum of all the different measurements combined that create the perfect fit.
So in today's episode, we'll be looking at 12 core key measurements that you always need to be considering when creating your hoodie fit. So whether you're going for an athletic cut or an oversized cut, you know how to play with these measurements proportionally to achieve the desired fit, and you're never leaving out a core measurement, like in my original example, that could actually make or break the fit. So without further ado, my name is Shadi Adada. Let's get right into the episode.
Rule 1: lay it flat, measure to the 1/8 inch
Rule number one is we have to understand that when measuring a hoodie for the purpose of fit, and when using a reference hoodie for the purpose of fit, we need to have the specimen laid out flat on the floor, on a completely flat surface with no bumps in it, and all of the measurements laid out flat.
Then we need a tape measure. Specifically, a tape measure, whether you're dealing in centimeters or in inches, that is going to be accurate down to the millimeter, or down to the eighth or even sixteenth of an inch scale. And if you're unsure how to measure in inches, I've done a separate video in the past that teaches you how to go through the eighth scale measurement, which is essential. You can check out the link in the description below.
Make sure as well that when the hoodie is laid out flat, if it's a zip-up hoodie, it's fully zipped. And if it's a hoodie that has some sort of elasticated cuff at the bottom, or some sort of spring-loaded elasticated cuff, release or relax the elastic cuff and let it lay naturally in an unstretched and unpulled position. That way you're getting the most accurate and consistent measurement possible.
1. Body length
So going into the measurements, the first section is going to be the body. So measurement number one is going to be the length of the body, and there are two different ways to do it. You can either do it from the HPS, or the highest point of the shoulder, which is measured from where literally the highest point of your shoulder line is, from the stitch line, all the way down vertically to the bottom of the hemline, where either the cuff or the actual hemline finishes. So the edge of the fabric, measured in a straight line.
It's also very important that you note the size of the garment that you're working with, and that you keep it consistent. On men's, I typically like to measure a size medium, because that's my sample size, and on women's I measure a size small, because that's my sample size.
I typically also like to do the center back as opposed to the HPS. I usually reserve the HPS for garments like tank tops and sports bras, specifically products that may not have a clearly defined center back, just because I do tend to find the center back to be the most consistent measurement for tops. So the center back will be from the center back of where the neckline swoops down, at the stitch, all the way down to the bottom hemline. Usually the HPS and the center back will differ by around an inch, maybe an inch and a bit, depending on the garment itself.
2. Chest
Number two is going to be the chest measurement, which is going to be measured from armpit to armpit. So where your sleeve inserts into your side seam, that angle there is where I typically measure from. Some other companies may measure one inch below, but I like to keep it consistent. I like to be able to visually mark where my measurement needs to go from, and I know where the sleeve inserts into the side seam. The armpit, basically the place where your side seam starts going into your sleeve, that's exactly where the armpit line is, and that's where I measure my chest half width from: left armpit all the way to the right armpit. That gives me a really good idea of how large the chest is.
3. Bottom (and the waist)
Number three is the bottom half width, which is going to be from the bottom left side, where the hemline ends in the corner. So not above the cuff, below the cuff: the bottom left corner where it ends, all the way through to the bottom right side, where the hemline cuff corner ends. And I make sure that I'm not stretching or tightening the hemline, so I'm getting an accurate measurement and an accurate read.
An added bonus there is if you do have an athletic cut. For example, with some of the earlier athletic performance hoodies, we used to taper in the waist a little bit, so it may be useful to also get the waist half width measurement. So you have the chest half width line, you have the bottom half width line, we take exactly the middle of that, and that's where we measure the waist, from left side to right side, going from edge of fabric to edge of fabric. That's usually the waistline.
What you'll notice here is that if you have an aggressive taper, your waist half width may actually be smaller than your bottom half width. Versus if you have a boxy cut, your chest, your waist and your bottom should be the same. And if you have a tapered cut, it should almost look like a trapezoid, where your waist half width is right in the middle between your chest half width and your bottom half width. So let's just say your chest half width is 22 and your bottom half width is 20: your waist half width would be 21.
4. Shoulder length
Moving on, you have number four, which is going to be the shoulder length. Some brands may measure your shoulder length from the edge of your shoulder seam on the left side to the right side, so where your shoulder line ends and where it inserts into the actual sleeve seam, from left to right. I typically like to measure the actual shoulder line. So that's basically from where your collar half width ends, all the way down to where your shoulder length ends and where your sleeve begins.
The reason I measure it that way is it just gives me a good indication of the overall length, and sometimes I even measure the perpendicular depth of how much that angle slopes. In a situation where you have a raglan sleeve, your shoulder length would be unnecessary, simply because you don't have a dedicated shoulder seam.
5. Sleeve length
Number five is going to be your sleeve length. So if you have a set-in sleeve, specifically where the sleeve and the torso are separated from each other, then your sleeve length is going to be from where your shoulder length ends, all the way down to where your actual cuff ends.
With an oversized hoodie, maybe with a drop shoulder effect, this is going to be a little bit different, because in general your drop shoulder kind of mimics your raglan sleeve, where your shoulder seam and your sleeve seam operate as one. Versus a set-in sleeve, where you can clearly see that your shoulder seam and your sleeve seam are at an angle away from each other. So I want to show you a drop shoulder and a set-in sleeve hoodie, so you can see the difference in the slope.
So a raglan sleeve and a drop shoulder, I always measure them from the edge of the collar half width, all the way down in one measurement to the end of the cuff. And that's where both raglan and drop shoulder will typically mimic each other, and there wouldn't be a dedicated shoulder length in this case.
6. Armhole depth
Number six is going to be your perpendicular armhole depth. This is measured perpendicularly from where your HPS would typically be measured, or where the edge of your collar would be, vertically down to the boundary at which your chest measurement is meant to be measured.
So let's just say you have a hoodie. You have your chest measurement, the line from armpit to armpit, and that forms the horizontal boundary. Then you have a vertical line that comes from your HPS, or where the edge of your collar is, all the way down, and that would be your perpendicular armhole depth. That's going to be on a drop shoulder and on a raglan sleeve.
On a set-in sleeve, it's a little bit different. I typically measure it in two chunks. Your shoulder drop, which is from where your HPS is, perpendicularly down to where your shoulder slope ends. That's usually around 1.25 or 1.125, depending on the garment, and that's the drop. And then the remaining amount is your perpendicular armhole depth, which is from where the shoulder drop ends, all the way down to that imaginary line that we drew for the chest half width. That's your set-in sleeve drop, or perpendicular armhole drop, for your set-in sleeve garments.
7. Cuff opening
Moving on, we have number seven, which is going to be your cuff opening half width. Again, your garment is laid flat on the floor, the cuff unstretched and uncrumpled, and measured from edge to edge, from left to right, making sure that you have the fabric perfectly laid flat, or else you're going to get an inaccurate measurement.
I like to measure not just the opening of the cuff at the bottom, but also the opening of the cuff where it inserts into the sleeve. You'll always notice that your cuffs typically aren't going to be a rectangle. They're going to be a trapezoid, and this is more prevalent on oversized garments, where you're going to have a much looser forearm, bicep and shoulder fit, so you need some way to actually taper in towards the bottom. There's usually an aggressive taper.
What I tend to notice on an oversized or relaxed hoodie is that the cuff opening half width at the bottom is 3.875, and where I measure the top of the cuff, where it inserts into the sleeve, it's usually around 4.875 inches, or five inches on the half width. So that's a lot of extra ease to allow for a forearm measurement, which, as a bonus, I sometimes measure seven inches away from the opening of the cuff at the bottom, just to get a sense of where the forearm sits. It's not a mandatory measurement, but it is useful to have.
8. Hood height
Moving on now to the hood height. This is essential, because it gives you a sense of how the hood fits: how tall it is, how much depth it has, how much of an opening you have for the face. So the first thing that you want to do is lay the hood flat on its side. With the hoodie itself, you're laying it flat with the arms open. With the hood, you kind of have to fold the hoodie in half and have the hood profile laying flat for you. That way you can easily measure it.
Where I measure the hood height from is from where the center back would be, all the way perpendicular up to the top of the crown. Just as a rule of thumb, on a size medium you might get around 15.5 inches for that measurement, and that dictates how tall the hood is. It's pretty consistent, but that's just something to know.
9. Collar half width and the CB to CF drop
Moving on, then you want to measure the collar half width. In that same view, you're going to get the measurement horizontally from where your center back is, all the way to where your center front is, and that's going to give you a clear collar half width that you're going to want to follow, and the drop as well.
So from where your center back is to where your center front is, you're going to notice a slight S shape. It's never going to be in line, because your front neckline and your back neckline are never the same length, and that obviously is going to show up when it comes to the hood construction.
So those two measurements are essential here. One of them is a bonus measurement: the drop between your center back and your center front, which is usually going to be around an inch and a half, an inch and three quarters, maybe even two inches, depending on the fit. It's when you get them to be identical, or close to identical, that you end up with a hood that fits on the left and right shoulders, but doesn't fit correctly on the center front. And that's where it starts to choke on you.
10. Kangaroo pocket
Moving on, we have the pockets. Whether you have a welted pocket, an inset zipper pocket or a kangaroo pocket, the measurements are clear and they're essential. With the kangaroo pocket, what you want to look at is the width of the kangaroo pocket, measured from widest point to widest point, and then the height of the kangaroo pocket, measured from where it inserts into the waistband, so the waistband wouldn't be counted, all the way up to where it ends.
Just as a rule of thumb, you're typically getting around eight and a half to nine inches on the height, and around 12 and a half inches on the width. Sometimes you'll notice that the edges of the kangaroo pocket are not straight. They're kind of angled. So I go from the widest amount, just to get that clearance where the pocket slope starts, and that's where I measure from, as opposed to the bottom part, which may be in a little bit. You may also want to have that as an additional bonus, just to see how much clearance you have at the bottom of the pocket as well.
11. Inset and welt pockets
Number 11. If you have inset zipper or welted slip pockets, they're not going to be attached to the part where the main body fabric inserts into the waistband. They're going to be separated. So for those, what you want is the measurement of the pocket opening, measured parallel to the actual opening itself. And then you want to know how far in from the side seam your pocket is. If it's super angled, you'll give the measurement of maybe the outermost point, and then you might also specify how angled it actually is: angled in at five degrees, at ten degrees. Those are essential measurements as well.
You never want to have the pockets too far in, because you end up making the pocket bags too small. So you generally want the pockets around two inches away from the side seams, an inch and a half, maybe an inch and three quarters away from the side seams, just to allow for that. And you want the pocket opening to be at least 6.25 inches, 6.5 inches on a men's hoodie. On some women's hoodies, especially if they're cropped, they might have to be smaller, but at that point, what are you really fitting inside your pocket?
12. The details
Number 12, and last but not least, is all the other small miscellaneous measurements. I put them together here because they affect the character of the hoodie. That means the cuff heights, at the wrist and the waistband. For example, if you're going for a super chunky hoodie and you end up with a very small cuff, it just feels very off and disproportionate. So having the cuffs be consistent, and having, for example, the stitching on the edge of the hood be consistent, whether it's a quarter inch offset or an inch and a quarter offset. It doesn't make sense to have a super chunky hoodie with super chunky drawstrings when your hood finishing is like half an inch. It just looks a little bit off.
Then all the finishings on the pockets, like the width of the welted pocket: not only the height and the opening, but also the actual cover amount. Is it 0.5? Is it 0.75 on a chunky hoodie? On a more technical hoodie, you could have it around 0.5 inches on the width, to make it a little bit more low profile and hidden. So these are essential measurements that you should be following.
Wrap up
So hopefully you guys have enjoyed this episode, and you understand a little bit more about the core measurements that it takes to really measure and perfect a hoodie fit. It's almost like when you're creating a bespoke suit: knowing what measurements to grab from your customer, and knowing how to implement them into the jacket, is what creates a beautiful fit at the end.
So all these measurements that you're grabbing are what's going to allow you to create a very tailored fit. When it comes back from the factory and they've followed your measurements, you can move forward with confidence, knowing where you went right, where you went wrong and what you need to fix if it's not perfect. That way you can create the best possible hoodie that you can.
Work with us 1-on-1
And if you want to skip all that, if you want to work with someone who's done this before, who can get you that perfect fit from the first go and get a perfect sample in your hands in around 30 to 35 days, that you can start to pre-market, start to sell and start to use in your content machine to build a brand, well then, you can check out the link in the description to apply to work with us one-on-one. Within five minutes, a real human will get back to you with a personalized production roadmap on how we can help you take your idea, turn it into a sample in 30 days, and get you to market in under two months.
Guys, I say this from the very bottom of my heart, thank you so much for tuning in to this episode of FittDesign TV. Until next week's episode, stay awesome.
About FittDesign
FittDesign is a sportswear design agency. The team helps brands design, develop and produce quality activewear, sportswear and streetwear, from the first sketch and tech pack through sampling and bulk production.
Ready to get your hoodie fit right the first time?
Tell us what you're making and a real human will get back to you within five minutes with a personalized production roadmap. From your idea to a real physical sample in your hands in 30 days or less.
Get a quote → Takes 2 minutes. No obligation.